Showing posts with label Samples: Big Shot. Show all posts

Friday, June 17, 2011

Scallop Square Die

Yep, another graduation craft. Made this for my sis. Homemade chocolate chip cookies, in a repurposed Target nut container, with a Scallop Square chalkboard vinyl label. :) Yes, I am a chalkboard-label-holic.

I've gotta get up our Club cards soon!

Monday, May 16, 2011

DSP Candles

Here is the new decor in the Stamp Classroom. The SU items are:

Wide Striped Grosgrain on the bird cage.
Chalkboard Vinyl cut with Scallop Circles #2 Die on the glass jar vase
Greenhouse Gala DSP wrapped around the candles
Hemp Twine tied around the DSP

Wednesday, May 11, 2011

Jar Vases With Chalkboard Vinyl

These are more jars I made up for Mother's Day. We put flowers in them for gifts. My neighbor is using some for Graduation Party centerpieces. They are cute for so many things! Wedding centerpieces? That would be fun too. :)

I used chalkboard vinyl and Scallop Circles 2 Die to make the labels. And I used hemp twine, which is a good neutral to use with any color of flowers. :) It's barely there, but also it adds so much to these simple vases.

Sunday, April 10, 2011

Chalkboard Label

I made this little vase to take to Jeff's Grannie this weekend. I made the label using SU's chalkboard vinyl...cut with the Circles #2 Die. I tied hemp twine at the top, and then finished it off with a faux daisy. When the flowers start blooming, we can replace the fake flower some real ones. :)

Wednesday, March 30, 2011

Scallop Circle Die


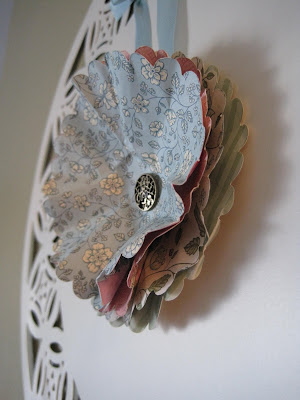
I used the Scallop Circle Bigz Die and cut out several layers in the Spring Vintage DSP. I attached all the layers with a vintage brad in the center. Then I crinkled all the papers. We have done this on a smaller scale to make small flowers with the scallop circle PUNCH. But I wanted a larger scale flower to display on my wall charger plate.

Here are the layers up close:


Then I adhered the flower to the plate with SU Baja Breeze Seam Binding. This was perfect for adding blue to my home decor for Spring. :)

Thursday, March 17, 2011

Spring Door Window

As many of you know, I try to get creative when working with this silly garage door window in the kitchen. For spring, I hung a little sign and added vinyl flourishes to the window. The flourishes are called, well, "Flourishes" in SU's Definitely Decorative brochure. I didn't use all the pieces. It's $14.95 and comes in black, chocolate, sand, white, and clear. I used chocolate.


Here is the sign up close. I painted a navy blue sign white. Then die cut letters with my Simple Alphabet dies from SU. The designer paper is my favorite, Greenhouse Gala. Then I put white paper flowers from SU all along the bottom with SU pearls in the center of each. The sign is hung with Marina Mist Seam Binding.


Today is one of our first beautiful spring days. Hope you are enjoying your day!

Thursday, March 3, 2011

Serif Essentials Art

THIS is what I was referring to about using DSP in my newly updated bathroom. The bathroom is "quite white". And the plan was for framed SU DSP to be the pop of color. I can change out the DSP whenever I want! :) And I can't wait to surprise my Stamp Club by changing the DSP often.

The word was cut out in my Big Shot with SU's Serif Essentials alphabet. I love those dies!

The DSP I am starting with is from Greenhouse Gala. It's turned out to be quite the paper for home decor projects!

Tuesday, February 8, 2011

Scallop Square Big Shot Die

The boys and I made this LOVE banner using the Bigz Scallop Square Die. It cut through chipboard and white cardstock at the same time. Then I glued the white cardstock onto the chipboard.

I punched holes through the chipboard using my Crop-A-Dile. That thing is a monster! :)

And I strung the pieces together with SU White Grosgrain Ribbon.

I would have used alphabet dies for the word LOVE, but the whole project was sparked by the boys wanting to do more with the "jewels" I got for us to play with. So they glued the jewels onto letters that I penciled in.

I like having all my stamping supplies on hand for when the boys and I decide we want to craft. :)

Wednesday, January 12, 2011

Scallop Circle Mini Cork Boards

There was a place on my stamp room wall where I really wanted to put up notes to myself. I didn't want an all out cork board, and I wasn't sure what to do. Then in one of my late night stamping sessions, I decided to die cut a piece of chipboard into little scallop circles. I cut out three and placed them vertically on the wall. They are perfect for little notes. :)

Remember, BIGZ dies cut through crazy thick material, like cork! And fabric and metal and wood sheets....and more!

Tuesday, October 19, 2010

Framed Greenhouse Gala

I've been trying to figure out what to hang above our bed, and recently decided framed scrapbook paper would be fun. When I pulled out all my papers, I was so happy that Greenhouse Gala was the perfect match for our blue and brown walls. And it adds some green, red, and yellow so that's nice. Actually, the stripe paper comes from the Nursery Suite Specialty. I liked the striped look from that, and the colors match the flower papers.

I used my Big Shot and alpha dies to do the vinyl. "K" is from Serif Essentials. "Always" is from Alphabet Simple Letters.


Now the part I am not sure about is the way I arranged these. It just doesn't look right to me. The bed is not completely centered on the wall so I didn't want to line the frames up in a horizontal line. But I don't know.....any thoughts before I put more holes in the wall???

Tuesday, September 14, 2010

Monogram Pine Cone Vase

I have a new obsession of trying to craftily decorate the new house. The Big Shot is so much fun for monogramming stuff!

Glass Vase: $1 Dollar Tree
Brown Base: $1 Dollar Tree
Pine Cones: boys picked them out of yard for me, for free ;)

Then I used SU white vinyl and Serif Essential alpha in the Big Shot.

Friday, September 10, 2010

Stamp Room Wall Art

I took the liberty to combine fabric and cardstock to create this piece for my stamp room wall. The fabric was leftover from the valence I made from the room.

Fabric makes up the background for the J and the flower. Certainly Celery cardstock is the background for the fabric.

I cut the "J" with my Serif Essentials alpha in the Big Shot, and I adhered it to the glass on the OUTSIDE of the project with Xyron adhesive. The flower is also on the OUTSIDE, with a designer button in the center. Finally, wide satin celery ribbon is also wrapped on the outside. I did put the backing OVER the ribbon so it is in place snug on the back.

I see a future class in the works here!

Thursday, September 9, 2010

Big Shot + SU White Vinyl + SU Serif Essentials Alpha = Personalized Stair Buckets for the Fam!

I was going to put small square baskets on the stairs until I found these pots on clearance at Target for 66 cents each. I thought they would blend in well, and I was right!

To avoid two of the same letter (Jamie & Jeff or Mommy & Miles), we have "Daddy", "Jamie", "Miles", and "Graham". It works.

Jeff is not so sure about this concept. But we are using it. He thinks the buckets should go away when company is over. I say it's "Pottery Barn-ish" and is ok to stay out because it's cute. Who is right?

Thursday, April 29, 2010

Basic Grey Fabric

Yep, Basic Grey makes paper AND fabric! I was excited to find a Basic Grey charm pack at a recent quilt show. This line is called Blush. I have squares laid out for my next rag purse. Once we get settled into the new house, this will be one of my first projects. Yay!

For now, I just have the layout to show you. Wish us luck on renovation! We have been set back a week by a vicious flu bug! Agh!

Wednesday, April 14, 2010

Another Purse

This is the fourth purse I tinkered with using the turquoise and brown fabric from my mom. I've had a lot of fun using the Big Shot Scalloped Square dies to cut fabric and putting together purse ideas. This is sort of like the rag purse, but it's a flat purse with a flap. I like these flat purses because they are easy to put together, ha, ha. I am lazy!

I did the flower embellishment using the Flower Folds Big Shot die. For the center, I used a large white grommet from SU. Fun stuff! The handle is just bought from Joann's.

Now I need to figure out my perfected, favorite version of all these purses. And then I will report back!

Tuesday, March 16, 2010

Cafe Bag, Take 2

Thank goodness for all this leftover fabric my mom gave me. I keep plugging away at making the perfect Cafe Bag, easiest for beginners. I actually have two more purses cut out so I can keep tweaking my design. Yay for cutting with the Big Shot, it's the easiest part!

The changes I have made so far from #1 to #2 are:
  • Magnet closure instead of flap
  • Handle will be pre-made instead of matching fabric
  • Flower will be a keyring on the handle instead of sewn on the front (not shown)
Features that will remain are:
  • Nine squares on each side. I like this size!
  • A long strap for wearing across the chest for hands-free shopping!
My next issues to consider are:
  • Inside ~ quilted squares with batting in between or fusible fleece with a lining
  • Whether to keep the magnet closure or just have the bag open
Again, I am a beginning sewer. Besides Angie Juda's rag purse, these are my first sewing projects. My mother doesn't understand why I can't just follow a pattern for my first tries. Good question! But I've always been one to tweak things to suit me best. And I also love simplifying things so I can share ideas with others. Once I perfect the features on this bag to be simple and easy, I would love to put out a tutorial for everyone!

Here is a closer look at Version 2 of my Cafe Bag.

Here is the store-bought handle up close. I got it at Joann's....much easier than making your own fabric strap, especially when it needs to be over a yard long!


And here is the magnet closure and the lining. I like magnet over a clasp and button, and it was easy enough to put on...kind of like a brad with prongs. But I'm also a lazy bag carrier. The easiest way to get into a bag the better. So maybe we just leave it open?

Doing a lining was fun, but I think Angie Juda's rag purse method of quilted squares being the inside may be the easiest. I'm off to try that next.

Any input is welcome!

Friday, March 12, 2010

The Cafe' Bag


My second sewing project, ever! I have wanted a purse like this so I decided to put the scallop square die to work again (my first project ever was the rag purse). This is one of those long handle purses that you can wear across your chest for hands-free shopping.

I went from a pattern in a quilt magazine, but it called for strips of fabric, not squares. And it called for muslin, but I used iron on fleece. And it had a cord strap, I used fabric. It didn't have a flap, I added one. Of course it didn't call for a Flower Folds flower either, LOL. So all in all, I guess you could say I came up with my own design. My purse is much larger than the pattern purse, too.

I'm calling this the Cafe Bag because this is a bag I would take into Starbucks to hang out with friends (like I get to do that all the time, HA!). But let's just pretend.

I had most of the scallop squares cut last night. It took about 5 minutes, LOL. Jeff asked, "How many does that cut at one time, anyways?!" I joyfully replied, "EIGHT"! I said, "I could never be a REAL quilter, but I can handle it with the Big Shot." He was impressed.

Then I called my mom today to run my ideas by her. I got to the shop at 10am to pick up fusible fleece and fabric for the lining and handle. Here's the lining. Isn't it pretty?


And here's the handle. The handle came from the same fabric as the lining. I had to get it just perfect to have those flowers showing. I did a pretty good job.


I actually sewed this flower together earlier in the day just for fun. This is made with the Flower Fold XL Bigz Die, a Stampin' Up! exclusive. But as the bag was coming together, I thought it would be the perfect embellishment. Now that I'm looking at it, it needs to go down into the lower block I think. Ah, I'll do that on the next bag.

The handles are actually not sewn in yet. I need some help from my mom. I just can't get my machine to go through all the layers. I hope she can do it on her machine with no problems.

This is definitely a prototype. I will change a few things on the next one. I especially want to figure out some decorative stitching. And although I love the flap, the original pattern did not call for one. That would be a LOT easier for all us new sewers! But overall, I really like how this turned out. I spent a whole day and night on it, yikes!

Let me know if you would like a tutorial on this once I get the kinks worked out! ;)

Vinyl Monogram

I got this new insulated lunch tote at Target recently. I cut a vinyl "K" with my Big Shot and Serif Essentials alphabet dies. This project took all of 5 minutes.

Did you know SU offers 23 colors of raw vinyl for all your die-cutting pleasures?! I find that I especially like having white and chocolate on hand, but I may have to start collecting some more fun colors soon! Take a look here!

Tuesday, March 9, 2010

Fabric Ponytail Holder

This is information cut and paste from SU's demo website for your inspiration!

Stamp: None

Paper: None

Ink: None

Accessories

  • Corduroy button
  • Sizzix Big Shot
  • Scallop Circle #2 Bigz die
  • Fabric
  • Needle and thread
  • Ponytail elastic
  1. Die cut 10 large scallop circles using Big Shot and Scallop Circles #2 Bigz die. Cut off eight of the scallops from each scallop circle. Gather together across the flat side about 1/4" from edge, gathering all ten circles on the same double-thread. Tie off.
  2. Die cut 10 small scallop circles using Big Shot and Scallop Circles #2 Bigz die. Gather the circles across three of the scallops on the same double-thread. Tie off.
  3. To cover Corduroy button, die cut a small scallop circle, then cut off all scallops. Gather the fabric around the edge, place button in the middle, then gather up threads and tie off.
  4. Attach ponytail elastic to back, then sew through all layers of fabric (including fabric around button), so fabric layers are connected to elastic.

Fabric & Big Shot Q&A

This information is taken directly from SU's demo website.

Crafting with fabric is one of the biggest industry trends right now, and we aren't just talking quilts! You can create beautiful fabric accessories and home décor with your Big Shot--even if you don't sew. The Sizzix Big Shot makes it easy to cut intricate fabric shapes to use in all your crafting projects. To help you get started, we have listed some basic questions and answers about using the Big Shot to create with fabric.

What type of fabric will the Big Shot cut? The Big Shot will cut all types of fabric. For a complete list of Big Shot-approved materials, click here.

How many pieces of fabric can I cut at a time? That depends on the fabric. Different fabrics vary in thickness. For example, your Big Shot can cut through eight layers of cotton, which is a relatively thin fabric, but it will only cut through one layer of faux fur, which is a very thick fabric.

Do you shim fabric in a Big Shot differently than paper? No. Your Big Shot works the same with fabric as it does with paper. Different fabrics vary in thickness, much the same as different paper materials vary in thickness. If you are only cutting one layer of a very thin fabric, you might need to use a piece of card stock as a shim just as you would if you were only cutting one layer of thin paper.

Will all Big Shot dies cut fabric? You can cut fabric with any of the Sizzix steel-rule dies (Originals, Bigz, Bigz L, and Bigz XL). You cannot cut fabric with Sizzlits, Embosslits, Textured Impressions Embossing Folders, or Texturz Plates.

Will dies with score lines ruin my fabric? You can still use dies with score lines to cut fabric. The score lines will slightly distress your fabric, but shouldn't damage it permanently. However, we recommend that if you are using dies with score lines to only cut one or two layers at a time (depending on the thickness of your fabric). If you try to cut too many layers at a time, it is possible that the score lines could tear your fabric.

Will cutting fabric with the Big Shot dull my dies? The Big Shot steel-rule dies (Originals, Bigz, Bigz L, and Bigz XL) were designed to work on several different types of materials. For a complete list of Big Shot approved materials, click here. Cutting fabric with your Big Shot dies will not result in any damage to your dies, and will not dull them any faster than cutting paper will.

Should I wash my fabric before working with it? It really depends on the fabric. Some lower-quality fabrics will shrink after they're washed, which could result in your project coming apart. However, many quilters don't wash their fabric first because the fabric is stiffer and easier to work with before it's washed. And if you use higher-quality fabrics, they will likely not shrink.

I just recently purchased my Big Shot. How does it work? You can find general information about the Big Shot on the Big Shot product page. We also have several videos that demonstrate how to operate your Big Shot. You can find those on our Video Techniques training page.

Does Stampin' Up! plan to sell fabric?
Stampin' Up! works hard to stay on trend, but it just isn't possible to offer every crafting product on the market. We will continue to explore new products and possibilities, but will keep stamps, ink, and paper as our core products.

I don't have a sewing machine. Can I still create fabric projects? Yes! The world of fabric crafting is as varied as the world of paper crafting. There are several alternatives to using a sewing machine. You can create many simple designs sewing by hand using a needle and thread or even a hot glue gun. In addition, fusible web is a great option for creating one-of-a-kind fabric crafts.

What is fusible web, and how does it work? Fusible web is a manmade fiber that will melt when heated with an iron and become sticky. When it is placed between two pieces of fabric, the melting of the web causes the fabrics to fuse together making it possible for you to adhere the fabric without the use of a sewing machine. Fusible web is available in rolls (similar to tape), in pre-packaged pieces, or is sold by the yard in your local fabric store.

My quilting friends mention things called charm packs, layer cakes, and fat quarters. What are they? Charm packs, layer cakes, and fat quarters are terms for precut cotton that is generally used for quilting. Charm packs include a variety of coordinating fabrics cut into 5" x 5" squares. The packs have an assortment of patterned and solid fabrics, and their small size makes them ideal for using on quilt blocks. Layer cakes are just like charm packs, but they are larger in size, with the cotton cut into 10" x 10" squares. Fat quarters are pieces of cotton cut into quarter yard segments. However, instead of being cut vertically, like you would cut a piece of fabric off a bolt, fat quarters are cut horizontally first, giving you a piece of cotton that measures 18" X 22". All of these options are a great way to get a good selection of fabrics at a relatively inexpensive price.