Showing posts with label Samples: 3D. Show all posts

Monday, May 13, 2013

Paper Bag Gift Packaging


Right now I am hosting a Thirty-One event at my milk allergy blog.  And I was inspired to package up one of my Thirty-One nail files and some nail polish as a cute little gift.  You will be able to get supplies similar to this from the new SU catalog starting June 1st.  I am so glad because I have been loving these little paper sack packages!  If you would like the new catalog, just contact me.  :)

Have a sunshiny day!

Wednesday, December 26, 2012

Letters to Santa Bingo


If you have the Letters to Santa DSP from the Clearance Rack...check out the cute sheet with the BINGO cards.  I actually cut mine out (6x6) and made them into a game for our family!  

There are 4 different cards, which is perfect for us.  For the markers, I got out my salt shakers of buttons.  We each picked a color.  Then I wrote the numbers 1-24 on slips of paper and put them into a paper bag.  We took turns drawing the number for everyone to mark off.  

But the fun part was that I also put in slips of paper that said "chocolate" and "marshmallow".  So if someone drew a snack card, we all got to have a chocolate chunk or marshmallow!  And the person who won got to have one of each.  We had so much fun collecting our stash of treats.  The boys played this over and over for days.  :)  


Saturday, December 22, 2012

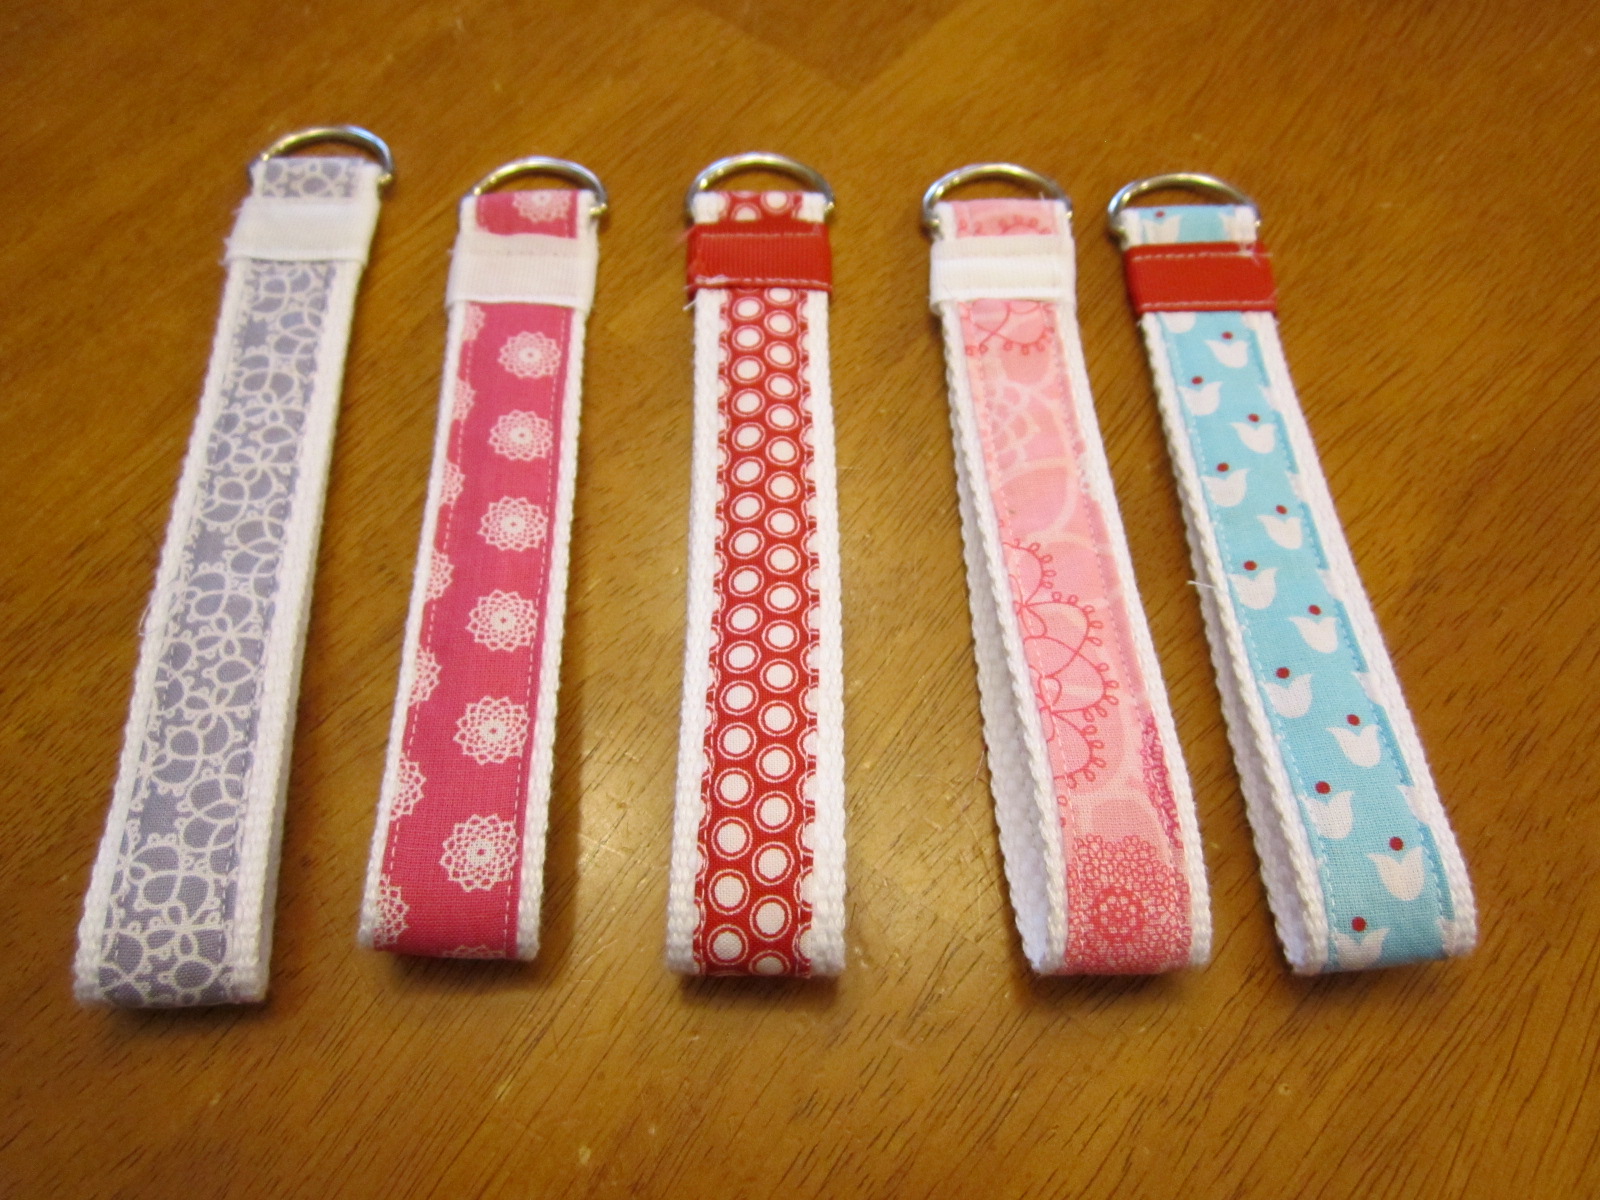
SU Fabric Key Fobs!!!


Check it out, peeps!!!  I have had these on my "to-do" list for more than a year.  I have even had the supplies that long, ha!  Then one late night this week I just started breaking out the fabric and got to work.  I absolutely love how these key fobs turned out!!!  All the SU fabric is so darn fun!

If you were a college roommate who had to make mac-n-cheese outside of my dorm room so not to cause me to throw up from the smell.....then YOU received one of these in the mail for Christmas.  :)

And now it appears that I MAY be taking orders for making these.  :)

Did you know SU has some cute fabric on the Clearance Rack for 99 cents?!  :)

Which fob fabric is your favorite?!

Thursday, December 20, 2012

Crafty Christmas Gifts

The great thing about having a large stash of craft supplies is that you can always come up with great, handmade gifts.  Don't be afraid to make your gifts!  :)  

Here I made the boys' music teacher a few gifts.  I made her a pack of note cards.  And Graham wanted to make her a candy cane holder.


Miles wanted to make her an ornament.


And we even made a tag for the gift bag.  


Are you making some handmade gifts this year?  :)

Wednesday, December 5, 2012

Snow Festival Decor ~ The Bathroom


I still have no regrets about doing our bathroom all in white so I can decorate in color.  :)  It's so fresh and bright.  I love it!

For Christmas, I used Snow Festival products....again!  I framed Snow Festival designer paper and matted one of the felt ornaments.  It's so sharp looking!

On the shelf, I did white and silver with a touch of green...using Gumball Stitched grosgrain.  Ribbon makes everything better!  :)


This may look boring to some.  But there's just something about simplicity that appeals to me!  :)

Sunday, December 2, 2012

Snow Festival Christmas Decor


There's no hiding how much I love SU's Snow Festival products in the Holiday Catalog.  :)  We put Christmas decor up yesterday, and I found myself reaching for my Snow Festival goodies several times!  The  Cherry Cobbler red matches our "subtle, organic" theme so well!

Not only did I put our framed art up on the shelf in our kitchen, but I used one of the felt ornaments on the tin above our stove.  I switch things out for the tin all the time.  All I have to do is hot glue a magnet to the back.  :)


Next I will show you how I used Snow Festival in the bathroom.  :)

Tuesday, November 27, 2012

Kraft Boxes 30% Off Through Tomorrow

d


One of the items on SU's 20-50% Off Sale is the popular kraft boxes.  Through tomorrow, you can get a package of four for $2.07.

These are so easy to embellish!  Package inexpensive treats in these for Christmas.  :)

If you would like to place an order, contact me by tomorrow night to get in on the big sale!


Kraft Gift Box - by Stampin' Up!

Thursday, August 16, 2012

Handmade Wedding Gifts

My cousin got married over the weekend, and I spent the day before making her some handmade gifts.  I had seen through blogs and Facebook that she has an appreciation for Etsy items so I figured this was my chance to make some handmade gifts.

First, I made her a menu board for her kitchen.  They asked us to submit recipes for a surprise cookbook for her so I thought this would coincide well with her new cookbook.

I picked up the frame at TJ Maxx.  I also added a Velcro-on dry erase marker, wrapped in designer paper.  To "seal" the paper on the marker, I wrapped it carefully in packing tape.  Click the picture to see how I used many of my Stampin' Up! supplies to make this.

Lovely Letters Alphabet
Summer Smooches Paper
Limeade Cardstock
Limeade Ruffled Ribbon
Modern Label Punch
Word Window Punch
1 3/4" Circl Punch


Then I made them coordinating monogram cards.  This time I used my Broadsheet Alphabet Stamps.  I loved that G. 


Finally, I made a set of coordinating magnets using designer papers.  I also wrapped them in an organdy bag, but forgot to take a picture.


To make these, just pick up clear flat rocks and strong magnets at the craft store.  Punch out designer papers with your 1" circle punch.  Use Crystal Effects adhesive to put the paper onto the rock.  Then I SHOULD have sealed the back of the paper with more Crystal Effects, but I didn't.  Finally, hot glue a magnet onto the back of the rock, paper side.


And I wish I had taken a picture of the gift bag.  I just picked up a reusable shopping bag from TJ Maxx that was real decorative and matched their wedding colors.  I tied the straps together with a ribbon and also tied my card to the straps with another ribbon.


Friday, June 29, 2012

In-Color Pinwheels


I made some paper pinwheels for our summer decor.  Yep, that's milk glass vases.  Don't they look so fresh and nice with the colorful pinwheels?!  Makes me want to hit an antique store RIGHT NOW!  ;)


 I even used the coordinating In-Color designer brads.  They are so cute. 


This has me thinking....I think I want to do a 2011-2012 In-Color Share similar to the 2012-2013 In-Color Share we just did.  Offering the 12x12 was a hit, and I would love to do some scrapbook pages in these colors.  Would you!?

I am linking to:


Wednesday, December 21, 2011

Stamp Club: December 2011


We made this gift card holder. It's the owl punch turned into a penguin. I got the idea from Julie Davison.

This design has been used before for treat holders. You just use an envelope, fold it in half, cut the flap in half, and adhere down the left side. The right side flap stays open for the gift card.

I wanted to keep this holder very simple so we just did the belly band for closure. I have some more of these to make before Sunday!

Monday, December 19, 2011

Stamp Club: December 2011


Here is a gift card holder I demonstrated at Stamp Club this month. I am sure we all need a gift card holder or two! :)

This is so easy. Just seal up an envelope. Then cut one end off at about 1.5". You will use both parts of the envelope that are cut. The small part is the lid. The big part is the holder.

I punched my small piece (the lid) with a scallop edge punch. You don't have to do this step.

For the large piece (the holder), you will need to crimp it to shrink it's width a bit. I crimped mine in both directions and got a waffle pattern. When you shrink the holder with a crimper, the lid will then fit over the holder perfectly!

Embellish as you desire.


Merry Christmas Week!

Wednesday, December 14, 2011

Stamp Club: December 2011


We made these match book Christmas planners at Club this month. I am using mine to keep track of my gift-buying and to store some receipts. You could also store gift cards in the pocket, instead of bulky receipts.

The base card stock is 11 x 4-1/4". That's half a sheet of card stock, cut vertically. :)

I scored at 1", 6", and 6.5".

The sides of the pocket are adhered with staples. The bottom of the pocket needs a strong adhesive, like sticky strip.

The bottom flap is just kept closed with ribbon, no adhesive.

The sheets of notebook paper are cut to size which is 4 x 3-3/4" here. I then stapled them together and covered the staples with DSP. The "notebook" is then adhered to the inside with very stick adhesive like sticky strip.


The squaring at the top was necessary for the bulk of the receipts.

I really do like having my gifts listed in something so cute, portable, and practical! :)

Saturday, November 26, 2011

Stamp Club: Novemer 2011

LinkThis was my November Stamp Club demonstration. I got the idea from Do Stamping With Dawn.

Stamp Set ~ It's A Wrap Holidays
DSP ~ Holiday Berry
Ink ~ Real Red
Ribbon ~ Red Grosgrain
Accessory ~ 3x5 Cello Bag

These are so easy. I love that 4 nuggets fit into SU's cello bags so perfectly. That means you don't need a Big Shot and big dies to enjoy using the It's A Wrap Stamps! :)

Tuesday, November 22, 2011

SU Fabric Ornament

One day when I was moving things around in my stamp room, I came across a bag of Ball Jar lids that I stored last year. I had bought plastic lids to use on my jars instead, but figured I better save the metal lids for a rainy day project or something.

Well I was immediately inspired when I found them. I knew exactly what I could do with them. I made an ornament with SU's fabric. It took about 15 minutes. That's it.


Here were the supplies I used:


I put the fabric over the back side of the lid and then pushed it in place with the flat piece of the lid.


Then I hot glued the edges of the fabric down. I used my bone folder to push the fabric down because hot glue comes through the fabric easily and burns fingers! Ow! Ask me how I know?!


Then I took out the metal piece covered in fabric and added my hanging ribbon. I used SU's grosgrain white.


Then I put the metal piece wrapped in fabric back into the lid. I cut thick chipboard with SU's Scallop Circle Die. It fits PERFECTLY into the back of the lid to keep everything in place. You can even write a sentiment on the chipboard if you want. If you don't have the SU die, you can cut a cardboard circle by hand. It doesn't have to be scalloped.


Then I just glued a decorative red bow on the front.


SU has a variety of fabric that we can choose from. I can't wait to make several different versions of this. :)

Let me know if you give this a try! I plan to make some for our own tree and more for gifts. :)

Saturday, October 22, 2011

Christmas Gifts Class - Sneak Peek

Here is a second project we will be doing at the Gifts Class. It's the note card pack, using fabric monograms! And the packaging is just as cute as the cards themselves. If you would like to squeeze into the class last-minute, let me know. I may have a spot. Here are the details:

DATE: Monday, October 24th
TIME: 6-9pm
PLACE: Jamie's House
RSVP: Monday, October 10th (prepayment required)
COST: $18 with one punch

Gift 1: Altered Gift Box with Chocolate & Decorative Magnet, Wrapped in SU Fabric
Gift 2: Pack of Monogram Cards using Fabric & Packaged in Protective, Altered Card Holder
Gift 3: Gift Card Holder using the new Scoring Tool
Gift 4: Set of 4 Coasters Packaged in Altered, Protective Case

Friday, October 21, 2011

Christmas Gifts Class - Sneak Peek

Here are the four coasters in a stamp case, wrapped in ribbon. The coasters are great! I can't wait to make up a bunch for my living space. The coasters are made with SU cork, window sheets, DSP, and sticky paper. There's still one spot in my class if you want to learn how to make these and 3 other fantastic gifts!

Here are the details again:

DATE: Monday, October 24th
TIME: 6-9pm
PLACE: Jamie's House
RSVP: Monday, October 10th (prepayment required)
COST: $18 with one punch

Gift 1: Altered Gift Box with Chocolate & Decorative Magnet, Wrapped in SU Fabric
Gift 2: Pack of Monogram Cards using Fabric & Packaged in Protective, Altered Card Holder
Gift 3: Gift Card Holder using the new Scoring Tool
Gift 4: Set of 4 Coasters Packaged in Altered, Protective Case

Holiday Mini products we will be using are:

Simply Scored Tool
Kraft Gift Box
Holly Berry Bouquet (DSP, Buttons, Fabric)
Velvet Stitched Ribbon
Quilted Satin Ribbon
Jingle Bells
Glimmer Paper
Dazzling Details

Thursday, October 6, 2011

Matchbook Photo Holder

I demonstrated this project at our first Stamp Club. It's a matchbook photo holder that was featured in my SU demo magazine. But I changed the measurements so it is much easier to make. This project was used to acquaint our many club newcomers to the Big Shot. We used all the different kinds of Big Shot dies and folders.

Here you would put a small wallet size picture on the cover and write a title on the tag.


When you lift the front flap out of the the bottom slot, you see this.


There can be four to five photo pages tucked into the inside. I decorated each of mine with a Tasteful Trim border and each has a label tag to put on after the pictures are in place.


To make this, the easy measurement is to cut a 12x12 into thirds to get your base (my red piece in this project). That means each base is 12x4.

Then score each 12x4" piece at 5 1/4" and 11" to get your matchbook.

Tie a ribbon around the bottom fold to hold it tight. It's not just for decoration. ;)

Cut your picture insert cards at 4 x 5 1/2". That's one four inserts from one 8.5 x 11" sheet!

Layer and embellish your matchbook and picture inserts as you like!

Monday, June 27, 2011

Ice Cream Parlor Gift Set

I know the Ice Cream Parlor Scrap Kit expired after Sale-A-Bration, but I wanted to show ya what I made for my neighbor's high school graduation. The colors of the paper matched her party theme so well.

I filled an RSVP pen with DSP, and made note cards with the self-adhesive stickers. I sold a lot of Broadsheet Alphabets last month. See why? They make the cutest monograms! The gift set was wrapped with Peach Parfait ribbon.


As luck would have it, Starbursts also matched her color theme well so I made another study buddy jar with a chalkboard vinyl label.


See how stamping supplies can make fun gifts?!

Sunday, June 19, 2011

Spring Vintage Charms

Here's one thing you can do with scraps of DSP! I love making these little glass tile charms. :)

Friday, June 17, 2011

Scallop Square Die

Yep, another graduation craft. Made this for my sis. Homemade chocolate chip cookies, in a repurposed Target nut container, with a Scallop Square chalkboard vinyl label. :) Yes, I am a chalkboard-label-holic.

I've gotta get up our Club cards soon!